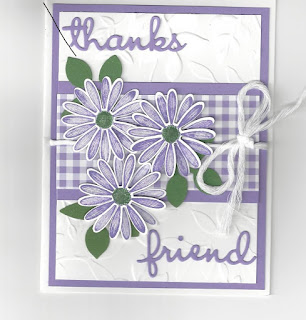
July Paper Crew Blog Hop — Daisy Lane Gingham Card
This month we are sharing projects using "anything floral". I hope you like my Daisy Lane card I've made for you.
Whisper White Cardstock 8-1/2 x 5-1/2 scored in half
Highland Heather Cardstock 5-1/4 x 4
Whisper White 5 x 3-3/4 Emboss this with the Layered Leaves folder
Gingham Gala 1-3/4 x 3-3/4
Highland Heather Cardstock 2-1/4 x 3-3/4
Garden Green Cardstock - cut 3 leaves using the leaf punch
Stamp 6 daisies using the stamp set, Daisy Lane.
The Stamparatus is helpful here because you can stamp the first Daisy then move down two markers and stamp the second Daisy. Once your page is full then flip the paper to the other side and do Daisies down that side. If any of the Daisies are not dark enough you can add more ink and stamp over it again. It is also a lot faster.
Use the Medium Daisy Punch to cut out each of the daisies. Use a colour that matches your gingham gala paper (I used the Highland Heather Cardstock).
Colour in the centre of the Daisy green to match the green that you use to make the leaves.
Attach the two Daisy pieces together to form a bigger flower. Use the mini dimensional to attach them together.
Affix the Whisper White Embossed Cardstock on top of the Highland Heather.
Put the small piece of Highland Heather on top of the White. Place this in the centre of the card.
Place the piece of Gingham Gala paper on top of the Highland Heather.
Use your Whisper White thick white twine to tie a ribbon around this whole card top. Do this before you affix the Highland Heather cardstock to the Whisper White base.
Affix your 3 green leaves on to the card and affix your Daisies on top of the green leaves.
Use Well Said Dies to punch out the THANKS and FRIEND.
Affix the thanks to the top of the card and the friend to the bottom of the card.
Use Wink of Stella to add some glitter to the card.
I used it on the flowers only.
You can do different versions of this card. We did one card using the Highland Heather Gingham Gala Paper and then stamping the Daisy Flowers in Daffodil Delight. It makes a lovely contrast.
I used the Daisy Lane Stamp Set, The Medium Daisy Punch, The leaf punch, Whisper White Cardstock, Highland Heather Cardstock, Gingham Gala Designer Series Paper, Whisper White thick White Twine, Layered Leaves 3D embossing folder, Well Said Dies, Mini Dimensionals and Multipurpose Liquid Glue.
If you are in Canada and you would like to shop with me, please click here to shop online 24/7. For questions or comments, you can email me too.
Happy stamping!! Karen
Please continue to hop along with our blog. Enjoy my talented friend, Arlene's post.
Please be sure to visit our other blog members:
Carol Saunders
Heather Stewart
Karen Turner -- YOU ARE HERE!
Arlene Luscombe
Mary Quick


Lovely card Karen. I'm quite a fan of the Daisy Lane and the Highland Heather is a great colour!
ReplyDeleteTerrific card, Karen! Love your choice of colours.
ReplyDeleteSuch a pretty card, Karen! The addition of the Layered Leaves embossed background really adds to the design. Great job!
ReplyDeleteOh my gosh, Karen. Love, love, love this. A few more things added to my wish list again. Great card, Karen.
ReplyDeleteLove daisies, love purple, love gingham, love your card! The embossing folder background is the finishing touch!
ReplyDelete